P4-Y 4/24 DevOps Hacks
Devops Hacks


KASM HACKS:
-
In 3-4 sentences, please explain the significance of virtual desktops and KASM. How can virtual desktops such as these be utilized in our AP CSP environment? (0.45)
-
Attempt to work through the KASM setup with your team. Attach two screenshots to show that you have successfully gone through the setup: The first screenshot of KASM generating your credentials, and the second screenshot of the KASM workspace once you have logged in. (0.45)
AWS DATABASES HACKS:
Quiz What is the main difference between relational and non-relational databases?
A. Relational databases are only used for structured data, while non-relational databases are only used for unstructured data.
B. Relational databases can easily handle high data volumes, while non-relational databases cannot.
C. Relational databases are based on tables and use SQL, while non-relational databases are based on collections and use JSON-like documents.
D. Relational databases are more expensive than non-relational databases.
The main difference between relational and non-relational databases is that relational databases are based on tables and use SQL, while non-relational databases are based on collections and use JSON-like documents. Therefore, option C is correct.
Which AWS database service is best suited for applications that require low-latency speed?
A. Amazon ElastiCache
B. Amazon Neptune
C. Amazon DocumentDB
D. Amazon RDS
The AWS database service that is best suited for applications that require low-latency speed is Amazon ElastiCache, so option A is correct.
What is the purpose of the code example provided in the lesson?
A. To demonstrate how to create a table in Amazon Aurora.
B. To show how to query data from a DynamoDB table.
C. To provide an example of how to connect to a database instance in RDS using Python.
D. To showcase how to insert data into a MySQL table.
The purpose of the code example provided in the lesson is to provide an example of how to connect to a database instance in RDS using Python. Therefore, option C is correct.
Results: 3/3
Quiz Which of the following is not an AWS database option?
A. Amazon RDS
B. Amazon Neptune
C. SQLite
D. Amazon DynamoDB
The option that is not an AWS database option is C. SQLite. Amazon RDS, Amazon Neptune, and Amazon DynamoDB are all AWS database options.
Which of the following is a file-based, lightweight RDBMS?
A. Amazon RDS
B. Amazon Neptune
C Amazon DynamoDB
D. SQLite
The file-based, lightweight RDBMS is D. SQLite. Amazon RDS, Amazon Neptune, and Amazon DynamoDB are not file-based or lightweight.
Which AWS service enables you to store and query highly connected datasets?
A. Amazon Relational Database Service (RDS)
B. Amazon DynamoDB
C. Amazon Neptune
D. Amazon DocumentDB
The AWS service that enables you to store and query highly connected datasets is C. Amazon Neptune. Amazon RDS and Amazon DocumentDB are relational database services, while Amazon DynamoDB is a NoSQL database service.
DuckDNS and AWS HACKS:
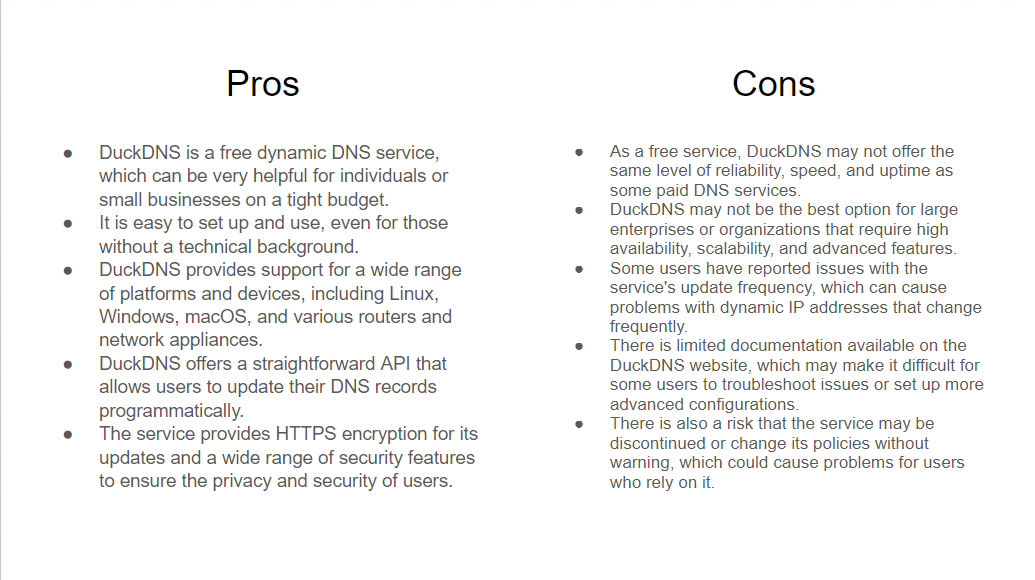
- HACK 1: Create a diagram (Canva). What are the pros and cons of using DuckDNS? Show a diagram of an application running on AWS using a DuckDNS system.
- HACK 2: Write a reflection. Why do we use DNS? How does DuckDNS work? What makes DuckDNS unique? How is DuckDNS useful for our projects? What are the steps to setup DuckDNS?
DNS is an essential component of the internet infrastructure that enables us to access websites and services using human-readable domain names instead of IP addresses. Without DNS, navigating the internet would be a much more complicated process. DuckDNS is a free dynamic DNS service that allows users to assign a custom domain name to a dynamic IP address. DuckDNS is unique in that it is completely free and open-source, making it an accessible option for individuals and small businesses who cannot afford paid DNS services. Additionally, DuckDNS offers a simple and easy-to-use API that allows users to update their DNS records programmatically, making it a flexible option for developers and automation. DuckDNS is useful for projects that require remote access to a network or server using a custom domain name. Setting up DuckDNS involves signing up for an account, choosing a subdomain, downloading a client software or using the API to update DNS records, configuring your router, and testing your setup. Overall, DuckDNS is a useful tool for anyone looking for a free and accessible dynamic DNS solution that allows them to assign custom domain names to dynamic IP addresses.
-
HACK 3: (EXTRA CREDIT): Create your own DuckDNS setup video.
-
HACK 4: In 2-3 complete sentences, talk about any outdated Nginx/Docker functionalities that may need to be addressed or any confusions you may have in regards to the deployment process from Trimesters 1 and 2.
Nginx/Docker has an old command called "docker run" command that should be changed because it's been replaced with "docker container run". Also, watch out for those outdated configurations because they might be using weak SSL protocols and ciphers that could mess with your security. It's a good idea to update them to use modern and secure options.
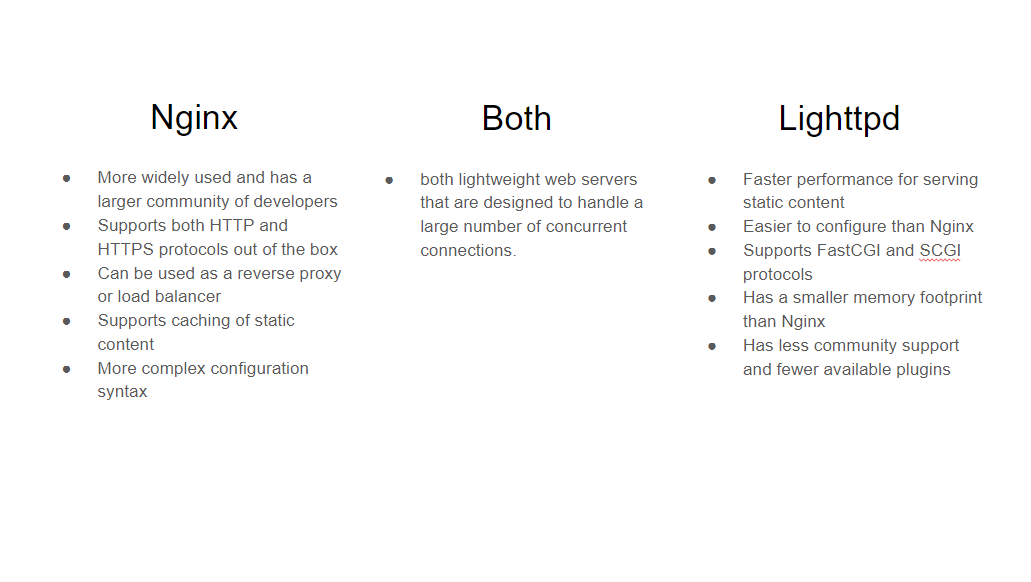
- HACK 5: Create a Venn Diagram comparing Nginx with Lighttpd.
- HACK 6: Complete the Python quiz and attach your output from the notebook (should be done once you do the quiz.)
import getpass, sys

# method to display question and get user's answers
def question_with_response(prompt, qCount):
    print("Question " + str(qCount)  + " : " + prompt)
    msg = input()
    return msg

# dictionary to hold questions and answers as key : value pairs
questionsDict = {"What does Domain Name Server represent?": "DNS",
    "What does this Represent: Amazon Web Services, which is a cloud computing platform provided by Amazon.": "AWS",
    "What is the first Step to setting up an AWS Server? 1: Connecting to a Ubuntu EC2 Instance, 2: Start updating the system, 3: Clone the repository which one wishes to deploy, 4: Run the command: main.py to start the project": "1",
    "What is the third Step to setting up an AWS Server? 1: Connecting to a Ubuntu EC2 Instance, 2: Start updating the system, 3: Clone the repository which one wishes to deploy, 4: Run the command: main.py to start the project": "3",
    "What is the fourth Step to setting up an AWS Server? 1: Connecting to a Ubuntu EC2 Instance, 2: Start updating the system, 3: Clone the repository which one wishes to deploy, 4: Run the command: main.py to start the project": "4",
    "What is the second Step to setting up an AWS Server? 1: Connecting to a Ubuntu EC2 Instance, 2: Start updating the system, 3: Clone the repository which one wishes to deploy, 4: Run the command: main.py to start the project": "2",
    "What files are you supposed to edit after finishing the first steps of setting up the server and cloning it within the AWS Server? 1: Edit the docker files and docker.yml, 2: Edit the main.py file to change the characteristcs.": "1",
    "What is the first step to setting up a DuckDNS Server? 1: Sign in with your DuckDNS account using Github, 2: Configure current ip to the IP address that you want to access and click update ip button , 3: Create the subdomain, 4: Access site by typing in subdomain.duckdns.org": "1",
    "What is the second step to setting up a DuckDNS Server? 1: Sign in with your DuckDNS account using Github, 2: Configure current ip to the IP address that you want to access and click update ip button , 3: Create the subdomain, 4: Access site by typing in subdomain.duckdns.org": "3",
    "What is the third step to setting up a DuckDNS Server? 1: Sign in with your DuckDNS account using Github, 2: Configure current ip to the IP address that you want to access and click update ip button , 3: Create the subdomain, 4: Access site by typing in subdomain.duckdns.org": "2",
    "What is the fourth step to setting up a DuckDNS Server? 1: Sign in with your DuckDNS account using Github, 2: Configure current ip to the IP address that you want to access and click update ip button , 3: Create the subdomain, 4: Access site by typing in subdomain.duckdns.org": "4"
}

# number of questions as length of the dictionary
questions = len(questionsDict)

# set correct to 0
correct = 0


print('Hello, ' + getpass.getuser() + " running " + sys.executable)
print("You will be asked " + str(questions) + " questions.")
print("Are you ready to take a test! Press Enter key to begin. Best of luck :)")
input()

questionCount = 0
# iterate over list of keys from the dictionary. pass dictionary key as question to the question_with_response function
for key in questionsDict:
    questionCount += 1
    rsp = question_with_response(key, questionCount)
    # compare the value from the dictionary to the user's input
    if rsp.lower() == questionsDict[key].lower():
        print(rsp + " is correct! Good Job!")
        correct += 1
    else:
        print(rsp + " is incorrect! Better Luck next time.")

# print final score
print(getpass.getuser() + " you scored " + str(correct) +"/" + str(questions))

# calculate percentage
page = correct/questions * 100

# print percentage


print("Total Percentage: " + str (format(page,".2f")) + "%")
CERTBOT HACKS:
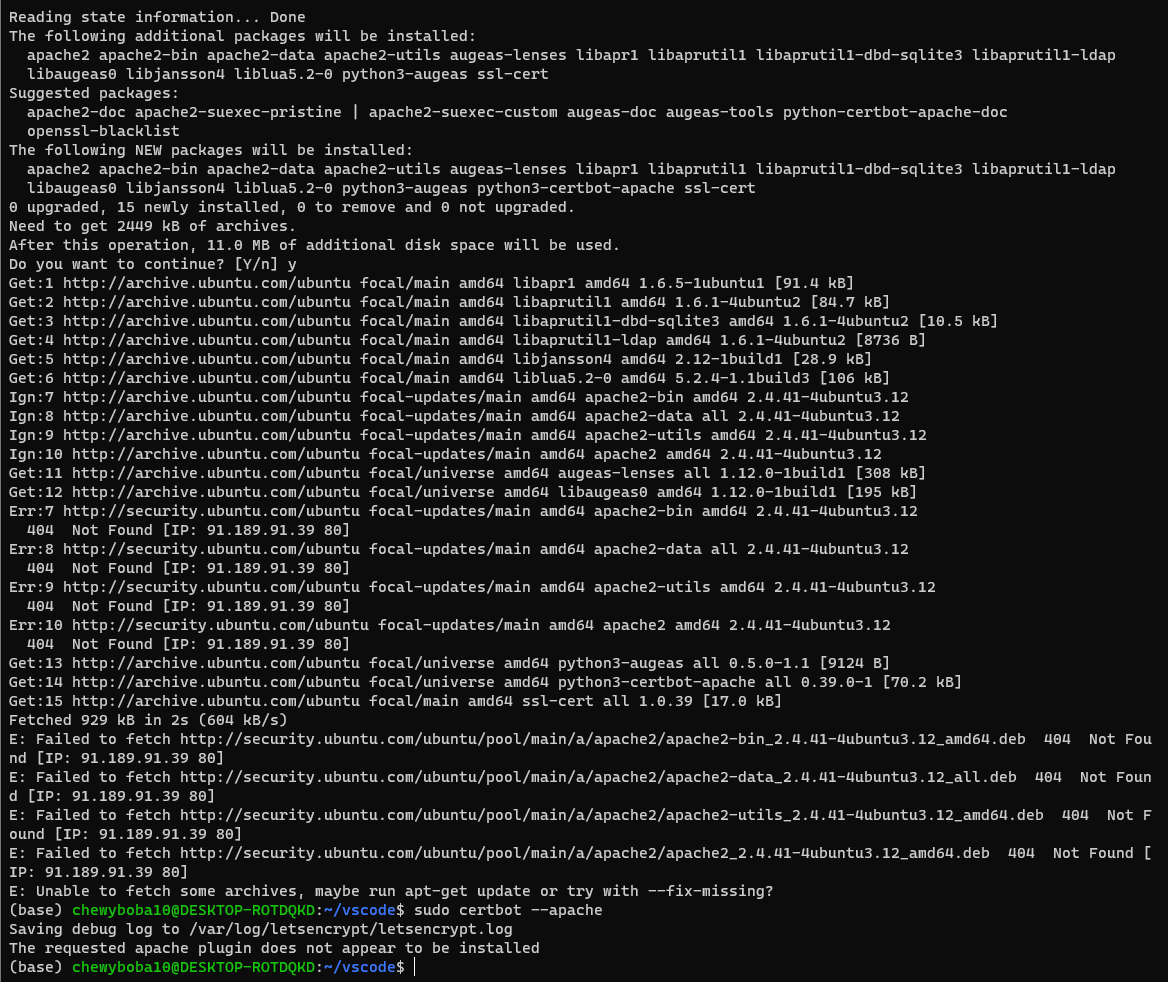
- Follow the instructions below and provide a full screenshot of all terminal commands after and including sudo certbot --apache all the way until it asks for the domain you want to secure. At this point you can take a screenshot and cancel the process. If you choose to continue the setup process and get Certbot fully working and show a before and after screenshot of your domain with http amd https connection we will grant extra credit points on hacks, or make up for lost points in other areas.
could not get further than this
- Research and compare the security features of OpenSSL and LibreSSL, and write about the recent vulnerabilities within it. Write about your research in a fastpages blog post. It can be the same post that has your screenshot for the Certbot Hacks.
OpenSSL and LibreSSL are both open-source libraries that provide cryptographic functions for applications. While OpenSSL has been widely used for many years, LibreSSL is a fork of OpenSSL that was created in response to concerns about the security and development practices of OpenSSL. One notable difference between OpenSSL and LibreSSL is the approach to security. LibreSSL focuses on improving the security of the codebase, while OpenSSL prioritizes backwards compatibility and interoperability. For example, LibreSSL removed support for several outdated protocols and ciphers, while OpenSSL continued to support them. Both OpenSSL and LibreSSL have been affected by several vulnerabilities. One notable vulnerability in OpenSSL was the "Heartbleed" bug, which allowed an attacker to access sensitive information from a server's memory. In response, the OpenSSL project increased its focus on security and created a dedicated team to perform security audits and reviews. On the other hand, LibreSSL has also faced vulnerabilities such as "LibreSSL RNG bug", "LibreSSL malloc() bug" and more. It has since then adopted more rigorous coding standards and has a more focused approach to security, including extensive testing and auditing of the codebase. In conclusion, both OpenSSL and LibreSSL provide important security functions for applications, but there are differences in their approach to security. OpenSSL prioritizes compatibility and interoperability, while LibreSSL places more emphasis on improving security. It is important for developers to stay up-to-date on the latest vulnerabilities and updates for both libraries to ensure the security of their applications.
SCORING GUIDELINES:
As talked about in class, we'll be looking for effort in the hacks. Though some setups may inevitably not work, we want to see that you took a stab at it and that you understand what the errors you're getting might mean.
FOR 2/4 SECTIONS OF HACKS COMPLETE: HIGHEST WILL BE A 3.2/4 POSSIBLE --> 0.8/1
FOR 3/4 SECTIONS OF HACKS COMPLETE: HIGHEST WILL BE A 3.6/4 POSSIBLE --> 0.9/1
FOR 4/4 SECTIONS OF HACKS COMPLETE: YOU CAN GET UP TO A 4/4 --> 1/1